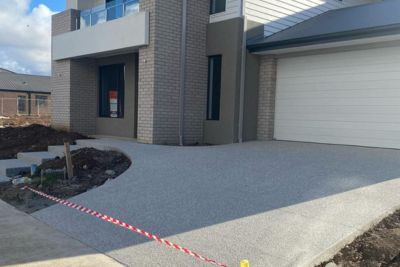
Sealing a concrete driveway might not be the most thrilling DIY project but if you want your driveway to last, it’s one of the smartest things you can do. Geelong’s climate can be tough on concrete with its mix of salty coastal air, wet winters, and hot summers. Over time, exposure to moisture, vehicle traffic, and UV rays can lead to cracks, stains, and surface wear. A quality concrete sealer acts as a protective barrier that prevents damage and keeps your driveway looking fresh for years.
The sealing process is straightforward but doing it right makes all the difference. Each step plays a big role in ensuring a durable finish, from cleaning and repairing to choosing the right sealer and applying it properly. Whether you are tackling this as a weekend project or just want to understand the process before hiring a professional concrete contractor, this guide will walk you through everything you need to know.
Why Seal a Concrete Driveway?
Before you seal your driveway, it’s best to understand what concrete sealing is and why this is important. Concrete may be one of the most durable materials, but it’s not indestructible. Since it’s naturally porous, it absorbs water, oil, and other liquids, which cause staining and long-term damage. This is especially important in Geelong, where coastal moisture and fluctuating temperatures can weaken concrete over time. By sealing your driveway, you create a protective layer that reduces water penetration, prevents cracks from forming, and minimises wear from daily use.
Sealing also makes maintenance much easier. Oil stains from cars, dirt, and even the occasional bird droppings will be less likely to soak in, meaning they can be cleaned off more easily. On top of that, a good sealer enhances the appearance of your driveway. A well-sealed driveway looks better and extends the lifespan of your concrete, saving you more money on repairs in the long run.
Step 1: Clean the Driveway Thoroughly

Your driveway needs to be completely clean before any sealing is done. Any dirt, dust, or stains left on the surface will get trapped under the sealer, ruining the finish and affecting how well it adheres. Start by sweeping away loose debris then use a pressure washer to remove built-up grime. If you do not own one, you can hire a pressure washer to make the job easier. If your driveway has oil or grease stains, apply a degreaser and scrub the area with a stiff-bristled brush. For some, there might be moss and algae growth in shaded areas so be sure to treat and remove them.
Once you’ve finished washing, give the driveway time to dry. Moisture is the enemy of good adhesion so if the surface is even slightly damp, the sealer may not bond properly. Let the concrete dry for at least 24 hours before moving to the next step.
Step 2: Repair Cracks and Holes
A solid and even surface is key to a successful seal so take time to inspect your driveway for cracks, holes, or chips. Even small cracks can become larger issues later on, especially with the mix of hot, dry summers and cooler, wetter winters. As moisture seeps in and expands during temperature changes, it can cause cracks to widen. To prevent this, use a concrete patching compound or flexible crack filler to repair any damaged areas.
Once you have applied the filler, smooth it out with a trowel and allow it to dry completely. If you skip this step, the sealer may not provide complete protection and any existing cracks will still be vulnerable to damage.
Step 3: Etch the Concrete (If Necessary)
If your driveway has a very smooth or previously sealed surface, it may need to be etched before applying a new sealer. This process helps create a slightly rough texture that allows the sealer to bond more effectively. Etching is useful is you have polished concrete or if the surface has been sealed previously. To test if etching is needed, sprinkle a little water on the surface. If it beads up instead of soaking it in, you will need to etch before sealing.
Using a commercial etching solution or diluted muriatic acid, apply the product according to the manufacturer’s instructions. Make sure you wear gloves, goggles, and protective clothing as these solutions can be harsh. After applying, rinse thoroughly and allow the driveway to dry completely.
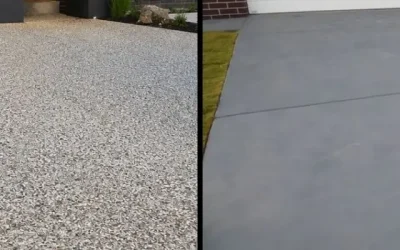
Step 4: Choose the Right Sealer

Choosing the right sealer depends on your needs and local weather conditions. If you want something low maintenance that doesn’t change the look of your driveway, a penetrating sealer is a great option. These soak into concrete, offering protection from moisture and stains without creating a visible film on top.
If you prefer a shinier finish, an acrylic sealer will give your driveway a glossy or wet-look effect but it may require more frequent reapplications. Epoxy and polyurethane sealers are the most durable but tend to be pricier and can make surfaces slippery when wet. Whichever type you choose, make sure it’s UV-resistant as low-quality sealers can fade or break down faster.
Step 5: Apply the Sealer
Before applying, check the weather forecast and pick a dry, mild day for the job. Geelong’s weather can be unpredictable and sealing on a rainy or overly hot day can affect how well the product sets. Once you’re ready, stir or shake the sealer well then start applying it in thin, even layers using a roller, sprayer, or squeegee. Work in sections to get even coverage without streaks or puddles.
If your sealer requires multiple coats, let the first one dry completely before adding another. Avoid walking on the surface while it’s drying and keep an eye out for debris like leaves or insects that might get stuck in the wet sealer.
Step 6: Allow Drying Time
Once the sealer is applied, the sealer needs time to set. While it may feel dry to the touch after a few hours, it’s best to wait at least 24 hours before walking on it. If you plan on driving on the surface, give it 48 to 72 hours before doing so. The longer you wait, the better the sealer will bond and cure. Blocking off the area with cones or barriers can help prevent accidental foot traffic while the sealer is drying. If possible, avoid letting pets, kids, or cars onto the driveway until it’s fully cured.
Step 7: Allow the Sealer to Properly Cure

Even though your driveway may seem dry after a couple of days, full curing can take up to a week depending on the product you use. During this period, it’s best to keep the area as clean and undisturbed as possible. Avoid placing heavy objects or using sharp tools that could scratch the surface.
If it rains during the curing process, check for any areas that may need a touch-up once the driveway dries again. Letting the sealer fully cure will maximise its durability and keep your driveway protected.
Step 8: Maintain the Sealed Driveway Regularly
Sealing your driveway is not a one-and-done task. Regular concrete maintenance helps keep the surface in top shape. Sweep away dirt and leaves at least once a week to prevent build-up. If you spot oil or grease stains, clean them up quickly with a mild detergent or concrete cleaner. If there’s moss or algae growth, scrub with diluted vinegar or commercial algae remover to keep things safe and slip-free.
Reapplying sealer every two or three years keeps your driveway protected. If your driveway gets lots of sun or heavy use, you might need to reseal sooner. Before applying, check for cracks or worn-out areas that need repairs. Fixing small problems early stops them from becoming bigger headaches.
Final Thoughts

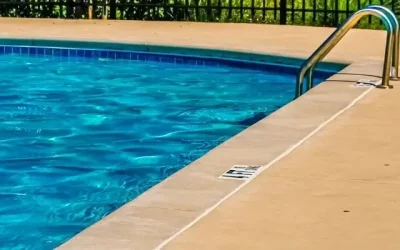
Sealing your concrete driveway might take a bit of effort but it’s well worth it. A good sealer protects against stains, cracks, and weather damage, helping your concrete last longer. It also makes cleaning easier and keeps your home looking great. While this guide focuses on driveways, the same process works for patios, pathways, and even pool surrounds. No matter the surface, proper sealing helps maintain durability and appearance.
If you want the best results, regular maintenance is key. Cleaning your surfaces and resealing them every few years will keep them in top shape. Whether you’re sealing for the first time or refreshing an old coat, following these steps will help. If you would rather leave it to the experts, our team can help. Get in touch today by calling us on (03) 5292 1455 or simply submit an online form and we’ll get back to you as soon as possible. Let us help you keep your concrete surfaces protected, durable, and looking their best!